一、功能按钮
格式:Button(父对象,options,…)
父对象:表示当前按钮建立在哪一个窗口下。
options:下面总结一部常用的。
1.bg或者background:背景色
2.fg或者foreground:前景色
3.command:单击按钮时,执行此方案
4.font:字体
5.height:字符高度
6.width:字符宽度
7.image:按钮上的图片
8.padx:设置文字与按钮左右间隔
9.pady:设置文字与按钮上下间隔
10.state:NORMAL表示启用按钮,DISABLED表示禁用按钮
11.text:字符
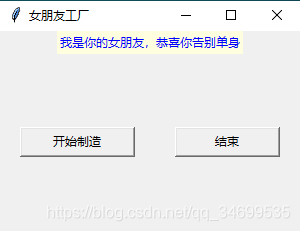
Button 初体验:这里我们建造一个制造女朋友的工厂,你只需要点一下按钮就可以告别单身狗
from tkinter import *

def msgShow():
    label[\"text\"]=\"我是你的女朋友,恭喜你告别单身\"
    label[\"bg\"]=\"lightyellow\"
    label[\"fg\"]=\"blue\"

# 实例对象
root=Tk()
root.title(\"女朋友工厂\")
root.geometry(\"300x200+500+500\")

label=Label(root)

btn=Button(root,text=\"开始制造\",command=msgShow,width=15)
btnCls=Button(root,text=\"结束\",command=root.destroy,width=15)
# 控件显示
label.pack(side=TOP)
btn.pack(side=LEFT,padx=20)
btnCls.pack(side=RIGHT,padx=20)
# 窗体暂停
root.mainloop()
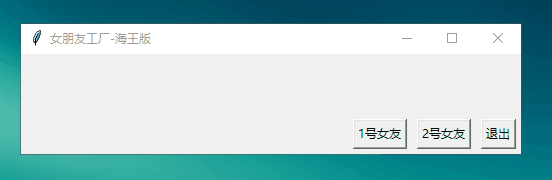
Button 进阶体验:上面的工厂只能造一个女朋友,但是作为一个海王,你现在想多拥有几个女朋友,那么现在你需要一个能制造多个女朋友的工厂【使用Lambda表达式】
from tkinter import *

# 工厂
def mkGrilFriend(name):
    lbl.config(text=str(\"我是\"+name+\"小姐姐,从现在开始我就是你的女朋友啦!!!\"))

root=Tk()
root.title(\"改变窗体颜色\")
root.geometry(\"500x100\")

lbl=Label(root)
lbl.pack()
exitBtn=Button(root,text=\"退出\",command=root.destroy)
# 制造女友
oneBtn=Button(root,text=\"1号女友\",command=lambda:mkGrilFriend(\"田园my 老师\"))
twoBtn=Button(root,text=\"2号女友\",command=lambda:mkGrilFriend(\"三上yy 老师\"))

exitBtn.pack(anchor=S,side=RIGHT,padx=5,pady=5)
twoBtn.pack(anchor=S,side=RIGHT,padx=5,pady=5)
oneBtn.pack(anchor=S,side=RIGHT,padx=5,pady=5)

root.mainloop()
运行结果:
二、文本框
格式:Entry(父对象,options,…)
options参数主要包括以下:
1.bg:背景色
2.fg:字体颜色
3.command:当用户更改内容时,触发此函数
4.font:字体
5.height:字符高度
6.width:字符宽度
7.selectbackground:被选定字符的背景色
8.show:常用于隐藏显示密码字段,ps:show= \’ * \’
9.state: NORMAL正常输入,DISABLE表示禁止输入
10.xscrollcommand:在x轴显示滚动条
包括方法:
1.get() 获取文本框内的字符串内容:ety.get()
2.insert() 插入字符串到文本框:ety.insert(开始位置索引,要插入的字符串)
3.delete() 删除文本框中的字符串:ety.delete(开始位置索引,截止位置索引:END等于全删)
4.eval() 数学表达公式:results=eval(2+3*5)
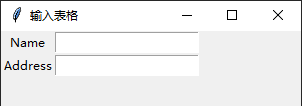
三、练习一
from tkinter import *

root=Tk()
root.title(\"输入表格\")
root.geometry(\"300x200\")

nameLbl=Label(root,text=\"Name\")
nameLbl.grid(row=0,column=0)
addressLbl=Label(root,text=\"Address\")
addressLbl.grid(row=1,column=0)

nameEty=Entry(root)
addressEty=Entry(root)
nameEty.grid(row=0,column=1)
addressEty.grid(row=1,column=1)

root.mainloop()
运行:
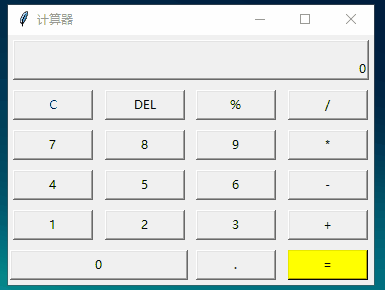
四、练习二:计算器
from tkinter import *

# 计算函数
def calculate():
    result=eval(equ.get()) # 获取输入公式
    equ.set(equ.get()+\"=\\n\"+str(result)) # 输入公式 + 回车换行 + 结果

# 显示到 Label
def show(buttonString):
    content=equ.get() # 获取公式变量,并拼接到content后面
    if content==\"0\":
        content=\"\"
    equ.set(content+buttonString) # 显示到label

def backspace():
    equ.set(str(equ.get()[:-1])) # equ 变量-1

def clear():
    equ.set(\"0\")

root=Tk()
root.title(\"计算器\")

# 公共变量,记录公式
equ=StringVar()
equ.set(\"0\")

# textvariable:指定一个变量刷新text值,这里的equ的set属性改变,label的text也会变化
label=Label(root,width=50,height=2,relief=\"raised\",anchor=SE,textvariable=equ)
# columnspan:横跨4个按钮
label.grid(row=0,column=0,columnspan=4,padx=5,pady=5)

# 第二行 [0,1,2,3列]
clearBtn=Button(root,text=\"C\",fg=\"blue\",width=10,command=clear).grid(row=1,column=0,pady=5)
Button(root,text=\"DEL\",width=10,command=backspace).grid(row=1,column=1)
Button(root,text=\"%\",width=10,command=lambda:show(\"%\")).grid(row=1,column=2)
Button(root,text=\"/\",width=10,command=lambda:show(\"/\")).grid(row=1,column=3)

# 第三行 [0,1,2,3列]
Button(root,text=\"7\",width=10,command=lambda:show(\"7\")).grid(row=2,column=0,pady=5)
Button(root,text=\"8\",width=10,command=lambda:show(\"8\")).grid(row=2,column=1)
Button(root,text=\"9\",width=10,command=lambda:show(\"9\")).grid(row=2,column=2)
Button(root,text=\"*\",width=10,command=lambda:show(\"*\")).grid(row=2,column=3)

# 第四行 [0,1,2,3列]
Button(root,text=\"4\",width=10,command=lambda:show(\"4\")).grid(row=3,column=0,pady=5)
Button(root,text=\"5\",width=10,command=lambda:show(\"5\")).grid(row=3,column=1)
Button(root,text=\"6\",width=10,command=lambda:show(\"6\")).grid(row=3,column=2)
Button(root,text=\"-\",width=10,command=lambda:show(\"-\")).grid(row=3,column=3)

# 第五行 [0,1,2,3列]
Button(root,text=\"1\",width=10,command=lambda:show(\"1\")).grid(row=4,column=0,pady=5)
Button(root,text=\"2\",width=10,command=lambda:show(\"2\")).grid(row=4,column=1)
Button(root,text=\"3\",width=10,command=lambda:show(\"3\")).grid(row=4,column=2)
Button(root,text=\"+\",width=10,command=lambda:show(\"+\")).grid(row=4,column=3)

# 第六行 [0,1,2,3列]
Button(root,text=\"0\",width=24,command=lambda:show(\"0\")).grid(row=5,column=0,columnspan=2,pady=5)
Button(root,text=\".\",width=10,command=lambda:show(\".\")).grid(row=5,column=2)
Button(root,text=\"=\",width=10,bg=\"yellow\",command=lambda:calculate()).grid(row=5,column=3)

mainloop()
运行:
到此这篇关于Python GUI之如何使用tkinter控件的文章就介绍到这了,更多相关tkinter控件的使用内容请搜索自学编程网以前的文章或继续浏览下面的相关文章希望大家以后多多支持自学编程网!