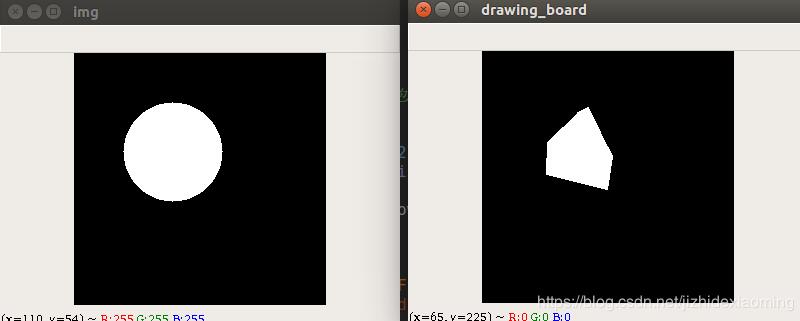
一、效果图:
二、代码
import cv2
import numpy as np

def generate_poly(image, n, area_thresh):
 \"\"\"
 随机生成凸包
 :param image: 二值图
 :param n: 顶点个数
 :param area_thresh: 删除小于此面积阈值的凸包
 :return: 凸包图
 \"\"\"
 row, col = np.where(image[:, :, 0] == 255) # 行,列
 point_set = np.zeros((n, 1, 2), dtype=int)
 for j in range(n):
  index = np.random.randint(0, len(row))
  point_set[j, 0, 0] = col[index]
  point_set[j, 0, 1] = row[index]
 hull = []
 hull.append(cv2.convexHull(point_set, False))
 drawing_board = np.zeros(image.shape, dtype=np.uint8)
 cv2.drawContours(drawing_board, hull, -1, (255, 255, 255), -1)
 cv2.namedWindow(\'drawing_board\', 0), cv2.imshow(\'drawing_board\', drawing_board), cv2.waitKey()

 # 如果生成面积过小,重新生成
 if cv2.contourArea(hull[0]) < area_thresh:
  drawing_board = generate_poly(image, n, area_thresh)

 # 如果生成洞,重新生成
 is_hole = image[drawing_board == 255] == 255
 if is_hole.all() == True: # 洞,则drawing_board所有为255的地方,image也是255,all()即为所有位置
  drawing_board = generate_poly(image, n, area_thresh)
 return drawing_board


img = np.zeros((256, 256, 3), np.uint8)
cv2.circle(img, (100, 100), 50, (255, 255, 255), -1)
cv2.namedWindow(\'img\', 0), cv2.imshow(\'img\', img), cv2.waitKey()

img_hull = generate_poly(img, 8, 100)
cv2.namedWindow(\'img_hull\', 0), cv2.imshow(\'img_hull\', img_hull), cv2.waitKey()
补充知识:opencv python 轮廓特征/凸包/外接矩形/外接圆/拟合矩形/拟合直线/拟合圆
1 图像的矩
cv2.moments()
图像的矩可以帮助计算物体的某些特征,如对象的质心,对象的区域等.
代码:
import cv2
import numpy as np

img = cv2.imread(\'img7.png\',0)
ret,thresh = cv2.threshold(img,127,255,0)
im2,contours,hierarchy = cv2.findContours(thresh, 1, 2)

cnt = contours[0]
M = cv2.moments(cnt)
print( M )
输出:
{\’m00\’: 283.0, \’m10\’: 8260.666666666666, \’m01\’: 34747.666666666664, \’m20\’: 251349.8333333333, \’m11\’: 1008063.0, \’m02\’: 4274513.166666666, \’m30\’: 7941981.4, \’m21\’: 30484543.9, \’m12\’: 123258620.46666667, \’m03\’: 526819846.70000005, \’mu20\’: 10223.989595602674, \’mu11\’: -6208.702394974302, \’mu02\’: 8080.874165684916, \’mu30\’: 8302.495426246896, \’mu21\’: -14552.154961312423, \’mu12\’: 11791.528133469663, \’mu03\’: -3268.923251092434, \’nu20\’: 0.12765785058625623, \’nu11\’: -0.07752253611575, \’nu02\’: 0.10089867729257346, \’nu30\’: 0.006162296011483629, \’nu21\’: -0.010800931752771139, \’nu12\’: 0.008751933371317017, \’nu03\’: -0.0024262672459139235}
此刻,可以提取有用的数据,如面积,质心等.
质心由关系给出:
cx = int(M[\’m10\’]/M[\’m00\’])
cy = int(M[\’m01\’]/M[\’m00\’])
2轮廓面积
cv2.contourArea(contour[, oriented])
3轮廓周长
cv2.arcLength(curve, closed)
第二个参数指定形状是否为闭合轮廓
4轮廓近似
它根据我们指定的精度将轮廓形状近似为具有较少顶点数的另一个形状.它是Douglas-Peucker算法的一种实现方式.
cv2.approxPolyDP(curve, epsilon, closed[, approxCurve])
第二个参数epsilon,它是从轮廓到近似轮廓的最大距离.第三个参数指定曲线是否闭合.
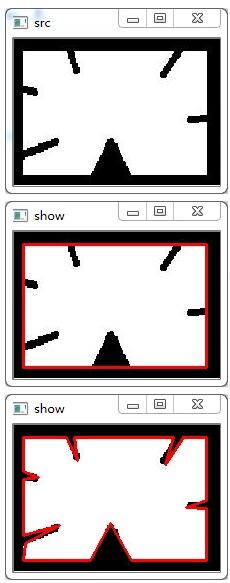
下面,在第二幅图像中,绿线表示epsilon =弧长的10%的近似曲线. 第三幅图像显示相同的epsilon =弧长的1%.
代码:
import cv2
import numpy as np

img = cv2.imread(\'img8.png\')
cv2.imshow(\'src\',img)
imgray = cv2.cvtColor(img, cv2.COLOR_BGR2GRAY)
ret, thresh = cv2.threshold(imgray, 127, 255, 0)
im2, contours, hierarchy = cv2.findContours(thresh, cv2.RETR_TREE, cv2.CHAIN_APPROX_SIMPLE)
cnt = contours[1]

epsilon = 0.1*cv2.arcLength(cnt,True)
approx = cv2.approxPolyDP(cnt,epsilon,True)
cv2.polylines(img, [approx], True, (0, 0, 255), 2)

cv2.imshow(\'show\',img)
cv2.waitKey()
5凸包
凸包看起来类似轮廓近似,但是它不是(两者在某些情况下可能提供相同的结果).
convexHull(points[, hull[, clockwise[, returnPoints]]]):检查曲线的凸性缺陷并进行修正.
points:传入的轮廓
hull:输出
clockwise:方向标志,如果为True,则顺时针方向输出凸包.
returnPoints:默认情况下为True,然后它返回hull points的坐标; 如果为False,则返回与hull points对应的轮廓点的索引
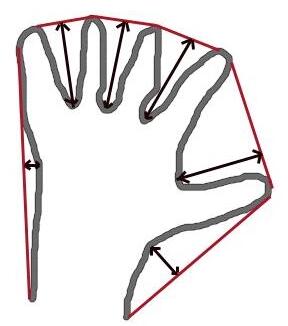
下面的手形图像. 红线表示手的凸包, 双面箭头标记显示凸起缺陷.
代码:
import cv2
import numpy as np

img = cv2.imread(\'img8.png\')

imgray = cv2.cvtColor(img, cv2.COLOR_BGR2GRAY)
ret, thresh = cv2.threshold(imgray, 127, 255, 0)
im2, contours, hierarchy = cv2.findContours(thresh, cv2.RETR_TREE, cv2.CHAIN_APPROX_SIMPLE)
cnt = contours[1]

hull = cv2.convexHull(cnt)
returnPoints = True,得到以下值:
array([[[192, 135]],
  [[ 9, 135]],
  [[ 9, 12]],
  [[192, 12]]], dtype=int32)
如果想找到凸性缺陷,需要传递returnPoints = False,得到以下结果:
array([[129],
  [ 67],
  [ 0],
  [142]], dtype=int32)
这些是轮廓中相应点的索引,检查第一个值:
cnt[129]
Out[3]: array([[192, 135]], dtype=int32)
与第一个结果相同.
6 检查凸性
cv2.isContourConvex(contour):检查曲线是否凸起
7 外接矩形
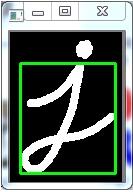
7.1 直边外接矩形
它是一个直的矩形,它不考虑对象的旋转。因此,边界矩形的面积不会最小.
cv.boundingRect()
设(x,y)为矩形的左上角坐标,(w,h)为宽度和高度
代码:
import cv2
import numpy as np

img = cv2.imread(\'img7.png\')

imgray = cv2.cvtColor(img, cv2.COLOR_BGR2GRAY)
ret, thresh = cv2.threshold(imgray, 127, 255, 0)
im2, contours, hierarchy = cv2.findContours(thresh, cv2.RETR_TREE, cv2.CHAIN_APPROX_SIMPLE)
cnt = contours[0]

x,y,w,h = cv2.boundingRect(cnt)
cv2.rectangle(img,(x,y),(x+w,y+h),(0,255,0),2)

cv2.imshow(\'show\',img)
cv2.waitKey()
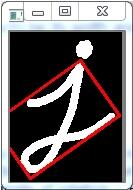
7.2 最小外接矩形
cv.minAreaRect返回一个Box2D结构,其中包含以下detals – (center(x,y),(width,height),rotation of rotation)
cv.boxPoints画上述矩形.
代码:
rect = cv2.minAreaRect(cnt)
box = cv2.boxPoints(rect)
box = np.int0(box)
cv2.drawContours(img,[box],0,(0,0,255),2)
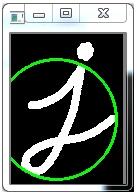
8 最小封闭圈
(x,y),radius = cv2.minEnclosingCircle(cnt)
center = (int(x),int(y))
radius = int(radius)
cv2.circle(img,center,radius,(0,255,0),2)
9 拟合椭圆
ellipse = cv2.fitEllipse(cnt)
cv2.ellipse(img,ellipse,(0,255,0),2)

10 拟合直线
rows,cols = img.shape[:2]
[vx,vy,x,y] = cv2.fitLine(cnt, cv2.DIST_L2,0,0.01,0.01)
lefty = int((-x*vy/vx) + y)
righty = int(((cols-x)*vy/vx)+y)
cv2.line(img,(cols-1,righty),(0,lefty),(0,255,0),2)

以上这篇python 生成任意形状的凸包图代码就是小编分享给大家的全部内容了,希望能给大家一个参考,也希望大家多多支持自学编程网。